Search Results
53 results found with an empty search
- FREE CROCHET SNOWMAN PATTERN
Easy to make free crochet Snowman pattern. Enjoy! Size 11 cm / 4.33 inch in height Tools & Materials Crochet hook size 2.5 mm Black safety eyes x 2 – size 6 mm Polyester Craft Filling for toys Tapestry needle and craft pins Scissors Stitch marker or a piece of yarn to mark the end of a round Yarn Orange (Rico Essentials Cotton DK, Pumpkin (87), 100% Cotton, 50g) Red (Stylecraft Natural DK Bamboo + Cotton, Rouge (7136), 60% Bamboo 40% Cotton, 100g) White (Stylecraft Natural DK Bamboo + Cotton, Chalk (7127), 60% Bamboo 40% Cotton, 100g) Natural (Stylecraft Natural DK Bamboo + Cotton, Natural (7146), 60% Bamboo 40% Cotton, 100g) Black (Stylecraft Natural DK Bamboo + Cotton, Pitch (7153), 60% Bamboo 40% Cotton, 100g) Skills required / abbreviations / info MG – magic ring (make specified number of single crochet stitches into the loop) Sc – single crochet Inc – 2sc increase (crochet 2 single crochet stitches into the same stitch) Dec – 2tog decrease (crochet 2 stitches together) BLO – back loops only FLO – front loops only CH – chain stitch Hdc – half double crochet (yarn over, pull through 3 loops on hook) Hdc inc – half double crochet increase (crochet 2 hdc crochet stitches into the same stitch) F/O – finish off R – spiral round Row – row ( )* – repeat the sequence in brackets to the end of the round (12) – number of stitches expected at the end of the round Work in spiral rounds, do not turn/join unless stated otherwise Watch FREE video tutorials on my Facebook page here SNOWMAN (colour white) R 1 mg, 6sc (6) R 2 (inc)* (12) R 3 (sc 1, inc)* (18) R 4 (sc 2, inc)* (24) R 5 (sc 3, inc)* (30) R 6 - 11 sc 30 (6 rnds) (30) Insert safety eyes between rounds 8 – 9, within a distance of 5 holes (count holes between the stitches). Stuff with polyester filling as you go. When completed, F/O and weave in remaining thread. R 12 (sc 3, dec)* (24) R 13 (in FLO: sc 3, inc)* (30) R 14 (sc 4, inc)* (36) R 15 - 24 sc 36 (10 rnds) (36) R 25 (sc 10, dec)* (33) R 26 (sc 9, dec)* (30) R 27 (in BLO: sc 3, dec)* (24) R 28 (sc 2, dec)* (18) R 29 dec to the end NOSE (colour orange) R 1 mg, 6sc (6) R 2 (sc 2, inc)* (8) R 3 sc 8 (8) R 4 (sc 3, inc)* (10) Make 1sl st to the next stitch to even out the nose. Stuff with polyester filling. Leave open, leave longer tail for sewing. Attach to the head between rounds 8 – 10. HAT (colours black and red) Start with colour BLACK R 1 mg, 6sc (6) R 2 (inc)* (12) R 3 (inc)* (24) R 4 sc 24 (24) R 5 BLO 24 (24) R 6 - 9 sc 24 (4 rnds) (24) Change colour to RED (don’t F/O red yarn when done, instead leave longer tail for sewing, then cut off – it will be used to attach the hat to the top of the head) R 10 - 11 sc 24 (2 rnds) (24) Change colour to BLACK R 12 (in FLO: CH 1; hdc inc)* (48) – when done, join with sl st to initial chain and F/O Place on the top of the head, secure with as many pins as possible to keep its shape round and position straight. Using needle and red sewing tail, attach to the head – make stitches where colour change is, between rounds 11 – 12, covering the red stitches only. When about ¾ of the ‘Hat’ is attached, leave a small hole and stuff it with polyester filling. Once ‘Hat’ is properly stuffed, finish sewing and weave in remaining thread. SCARF (colour natural) CH 101 Row 1 starting from the 2nd chain from the hook, make hdc 100, turn (100) Row 2 CH 1, hdc 100 (100) Leave longer tail for sewing. Wrap around the Snowman’s neck. Using needle and sewing tail, secure in place. © My Amigurumi Farm. All rights reserved. Feel free to sell finished product made from my patterns - please credit My Amigurumi Farm as a pattern designer. Do not reproduce, sell, distribute, alter or claim content of this website as your own.
- FREE CROCHET ONION PATTERN - one piece
Easy to make free crochet Onion pattern. Enjoy! Size 10 cm / 4 inch in height Tools & Materials Crochet hook size 2.5 mm Black safety eyes size 6mm x 2 Polyester Craft Filling for toys Tapestry needle and craft pins Scissors Stitch marker or a piece of yarn to mark the end of a round Small tweezers for stuffing Yarn Brown (Stylecraft Natural DK Bamboo + Cotton, Nutmeg (7147), 60% Bamboo 40% Cotton, 100g) Green (Stylecraft Natural DK Bamboo + Cotton, Spring Green (7126), 60% Bamboo 40% Cotton, 100g) Natural (Stylecraft Natural DK Bamboo + Cotton, Natural (7146), 60% Bamboo 40% Cotton, 100g) Dark Brown (Stylecraft Natural DK Bamboo + Cotton, Espresso (7148), 60% Bamboo 40% Cotton, 100g) Skills required / abbreviations / info MG – magic ring (make specified number of single crochet stitches into the loop) Sc – single crochet Inc – 2sc increase (crochet 2 single crochet stitches into the same stitch) Dec – 2tog decrease (crochet 2 stitches together) BLO - back loops only FLO - front loops only F/O – finish off R – spiral round ( )* – repeat the sequence in brackets to the end of the round (12) – number of stitches expected at the end of the round Work in spiral rounds, do not turn/join unless stated otherwise Watch FREE video tutorials on my Facebook page here ONION (colours brown and green) Start by making green parts of the Onion - make 1 longer part and 1 shorter part. Start with colour GREEN Longer green part – make 1 R 1 mg, 6sc (6) R 2 - 13 sc 6 (12 rnds) (6) Once longer part is finished, F/O and cut off yarn (when cutting off yarn, leave short tail and using needle weave it in). Stuff with polyester filling (use small tweezers for easier stuffing) and put aside for now. Shorter green part – make 1 R 1 mg, 6sc (6) R 2 - 7 sc 6 (6 rnds) (6) Once shorter part is finished, stuff with polyester filling (use small tweezers for easier stuffing), then join it to the longer part with sl st. Now, when both parts are completed, joined and stuffed, make: R 8 sc 6 (around 1st part), sc 6 (around 2nd part) (12) Don't count sl st as a stitch (skip it) Change colour to BROWN R 9 (in FLO: sc 1, inc)* (18) R 10 (in BLO: sc 2, inc)* (24) R 11 (sc 3, inc)* (30) R 12 (sc 4, inc)* (36) R 13 (sc 8, inc)* (40) R 14 - 18 sc 40 (5 rnds) (40) R 19 (sc 8, dec)* (36) R 20 (sc 4, dec)* (30) Insert safety eyes between rounds 16 – 17, within a distance of 5 holes (count holes between the stitches). Stuff with polyester filling. Using needle and a short piece of dark brown yarn, make smile (smile can also be made in the end, when onion is finished). R 21 (sc 3, dec)* (24) R 22 (sc 2, dec)* (18) R 23 (sc 1, dec)* (12) R 24 dec to the end Once onion is completed (stuffed and closed): go to BLO (made in round 10) and using hook make sc 1 in each stitch when finished, join to the first stitch with sl st; next, F/O and using needle weave in remaining thread as a last step, using colour natural, make roots (use crochet hook) © My Amigurumi Farm. All rights reserved. Feel free to sell finished product made from my patterns - please credit My Amigurumi Farm as a pattern designer. Do not reproduce, sell, distribute, alter or claim content of this website as your own.
- FREE CROCHET HEART PATTERN (3 sizes)
Easy to make free crochet Heart pattern in 3 sizes. Enjoy! Size 5 cm / 2 inch in height (red heart) 4.3 cm / 1.7 inch in height (pink heart) 3.8 cm / 1.5 inch in height (violet heart) Tools & Materials Crochet hook size 2.5 mm Polyester filling for toys Scissors Needle Small tweezers for stuffing Yarn Red (Stylecraft Natural DK Bamboo + Cotton, Rouge (7136), 60% Bamboo 40% Cotton, 100g) Violet (Stylecraft Natural DK Bamboo + Cotton, Heather (7138), 60% Bamboo 40% Cotton, 100g) Pink (Stylecraft Natural DK Bamboo + Cotton, Blush (7133), 60% Bamboo 40% Cotton, 100g) Skills required / abbreviations / info MG – magic ring (make specified number of single crochet stitches into the loop) Sc – single crochet Inc – 2sc increase (crochet 2 single crochet stitches into the same stitch) Dec – 2tog decrease (crochet 2 stitches together) Sl st – slip stitch F/O – finish off R – spiral round ( )* – repeat the sequence in brackets to the end of the round (12) – number of stitches expected at the end of the round Work in spiral rounds, do not turn/join unless stated otherwise Watch FREE video tutorials on my Facebook page here RED HEART Start by making 1st round part of the heart (R 1 - 4). R 1 mg, 5sc (5) R 2 (inc)* (10) R 3 (sc 4, inc)* (12) R 4 sc 12 (12) When completed, F/O, cut off yarn and put aside. Next, make 2nd, exactly the same part by repeating R 1 – 4. Once 2nd part is finished, don’t cut off yarn – instead join both parts with sl st. When both parts are made and joined, continue making heart. Stuff with polyester filling as you go. When done, cut off yarn and weave in remaining thread. R 5 sc 12 (around 1st part), sc 12 (around 2nd part) (24) Don’t count sl st as a stitch (ignore it) R 6 (sc 6, dec)* (21) R 7 sc 21 (21) R 8 (sc 5, dec)* (18) R 9 sc 18 (18) R 10 (sc 4, dec)* (15) R 11 (sc 3, dec)* (12) R 12 sc 12 (12) R 13 (sc 1, dec)* (8) R 14 (sc 2, dec)* (6) R 15 dec to the end PINK HEART Start by making 1st round part of the heart (R 1 - 4). R 1 mg, 5sc (5) R 2 (inc)* (10) R 3 - 4 sc 10 (2 rnds) (10) When completed, F/O, cut off yarn and put aside. Next, make 2nd, exactly the same part by repeating R 1 – 4. Once 2nd part is finished, don’t cut off yarn – instead join both parts with sl st. When both parts are made and joined, continue making heart. Stuff with polyester filling as you go. When done, cut off yarn and weave in remaining thread. R 5 sc 10 (around 1st part), sc 10 (around 2nd part) (20) Don’t count sl st as a stitch (ignore it) R 6 (sc 8, dec)* (18) R 7 sc 18 (18) R 8 (sc 4, dec)* (15) R 9 sc 15 (15) R 10 (sc 3, dec)* (12) R 11 (sc 1, dec)* (8) R 12 sc 8 (8) R 13 (sc 2, dec)* (6) R 14 dec to the end VIOLET HEART Start by making 1st round part of the heart (R 1 - 3). R 1 mg, 6sc (6) R 2 (sc 2, inc)* (8) R 3 sc 8 (8) When completed, F/O, cut off yarn and put aside. Next, make 2nd, exactly the same part by repeating R 1 – 3. Once 2nd part is finished, don’t cut off yarn – instead join both parts with sl st. When both parts are made and joined, continue making heart. Stuff with polyester filling as you go. When done, cut off yarn and weave in remaining thread. R 4 sc 8 (around 1st part), sc 8 (around 2nd part) (16) Don’t count sl st as a stitch (ignore it) R 5 (sc 6, dec)* (14) R 6 sc 14 (14) R 7 (sc 5, dec)* (12) R 8 (sc 1, dec)* (8) R 9 sc 8 (8) R 10 (sc 2, dec)* (6) R 11 dec to the end © My Amigurumi Farm. All rights reserved. Feel free to sell finished product made from my patterns - please credit My Amigurumi Farm as a pattern designer. Do not reproduce, sell, distribute, alter or claim content of this website as your own.
- FREE CROCHET EGG PATTERN
Easy to make free crochet Egg pattern. Enjoy! Size 6 cm / 2.5 inch in height Tools & Materials Crochet hook size 2.5 mm Polyester Craft Filling for toys Scissors Stitch marker or a piece of yarn to mark the end of a round Yarn Brown (Stylecraft Natural DK Bamboo + Cotton, Nutmeg (7147), 60% Bamboo 40% Cotton, 100g) White (Stylecraft Natural DK Bamboo + Cotton, Chalk (7127), 60% Bamboo 40% Cotton, 100g) Skills required / abbreviations / info MG – magic ring (make specified number of single crochet stitches into the loop) Sc – single crochet Inc – 2sc increase (crochet 2 single crochet stitches into the same stitch) Dec – 2tog decrease (crochet 2 stitches together) F/O – finish off R – spiral round ( )* – repeat the sequence in brackets to the end of the round (12) – number of stitches expected at the end of the round Work in spiral rounds, do not turn/join unless stated otherwise Watch FREE video tutorials on my Facebook page here EGG Make 1 egg using colour BROWN and 1 egg using colour WHITE. Stuff with polyester filling as you go. When completed, F/O and weave in remaining thread. R 1 mg, 6sc (6) R 2 (inc)* (12) R 3 (sc 1, inc)* (18) R 4 (sc 5, inc)* (21) R 5 (sc 6, inc)* (24) R 6 (sc 7, inc)* (27) R 7 (sc 8, inc)* (30) R 8 (sc 9, inc)* (33) R 9 (sc 10, inc)* (36) R 10 - 17 sc 36 (8 rnds) (36) R 18 (sc 10, dec)* (33) R 19 (sc 9, dec)* (30) R 20 (sc 3, dec)* (24) R 21 (sc 2, dec)* (18) R 22 (sc 1, dec)* (12) R 23 dec to the end © My Amigurumi Farm. All rights reserved. Feel free to sell finished product made from my patterns - please credit My Amigurumi Farm as a pattern designer. Do not reproduce, sell, distribute, alter or claim content of this website as your own.
- FREE CROCHET POTATO PATTERN
Easy to make free crochet Potato pattern. Enjoy! Size 7 cm / 2.75 inch in length Tools & Materials Crochet hook size 2.5 mm Polyester Craft Filling for toys Tapestry needle Scissors Stitch marker or a piece of yarn to mark the end of a round Yarn Brown (Stylecraft Natural DK Bamboo + Cotton, Nutmeg (7147), 60% Bamboo 40% Cotton, 100g) Cream (Stylecraft Natural DK Bamboo + Cotton, Buttermilk (7129), 60% Bamboo 40% Cotton, 100g) Skills required / abbreviations / info MG – magic ring (make specified number of single crochet stitches into the loop) Sc – single crochet Inc – 2sc increase (crochet 2 single crochet stitches into the same stitch) Dec – 2tog decrease (crochet 2 stitches together) F/O – finish off R – spiral round ( )* – repeat the sequence in brackets to the end of the round (12) – number of stitches expected at the end of the round Work in spiral rounds, do not turn/join unless stated otherwise Watch FREE video tutorials on my Facebook page here POTATO (colour brown) R 1 mg, 6sc (6) R 2 (inc)* (12) R 3 (sc 1, inc)* (18) R 4 (sc 2, inc)* (24) R 5 sc 24 (24) R 6 (sc 7, inc)* (27) R 7 (sc 8, inc)* (30) R 8 (inc)* - repeat continuously 6 times, then sc 24 (36) R 9 (sc 8, inc)* (40) R 10 - 19 sc 40 (10 rnds) (40) R 20 (sc 8, dec)* (36) R 21 (sc 4, dec)* (30) R 22 (sc 3, dec)* (24) R 23 (sc 2, dec)* (18) R 24 (sc 1, dec)* (12) R 25 dec to the end Stuff the potato with polyester filling, then F/O and close; next, using needle and a longer piece of yarn in brown colour, make dimples (make as many as you like – potato from this pattern has 5). Once all dimples are ready, using needle and longer piece of yarn in cream colour, embroider the bud on each dimple. © My Amigurumi Farm. All rights reserved. Feel free to sell finished product made from my patterns - please credit My Amigurumi Farm as a pattern designer. Do not reproduce, sell, distribute, alter or claim content of this website as your own.
- FREE CROCHET BLOOD DROP PATTERN
Easy to make free crochet Blood Drop pattern. Enjoy! Size 6.8 cm / 2.67 inches in height Tools & Materials Crochet hook size 2.5 mm Polyester Craft Filling for toys Black safety eyes x 2 size 6mm Tapestry needle Scissors Stitch marker or a piece of yarn to mark the end of a round Yarn Red (Stylecraft Natural DK Bamboo + Cotton, Rouge (7136), 60% Bamboo 40% Cotton, 100g) Black (Stylecraft Natural DK Bamboo + Cotton, Pitch (7153), 60% Bamboo 40% Cotton, 100g) Skills required / abbreviations / info MG – magic ring (make specified number of single crochet stitches into the loop) Sc – single crochet Inc – 2sc increase (crochet 2 single crochet stitches into the same stitch) Dec – 2tog decrease (crochet 2 stitches together) F/O – finish off R – spiral round ( )* – repeat the sequence in brackets to the end of the round (12) – number of stitches expected at the end of the round Work in spiral rounds, do not turn/join unless stated otherwise Watch FREE video tutorials on my Facebook page here BLOOD DROP R 1 mg, 6sc (6) R 2 (inc)* (12) R 3 (sc 1, inc)* (18) R 4 (sc 2, inc)* (24) R 5 (sc 3, inc)* (30) R 6 (sc 4, inc)* (36) R 7 - 12 sc 36 (6 rnds) (36) R 13 (sc 4, dec)* (30) R 14 sc 30 (30) Insert safety eyes between rounds 10 – 11, within a distance of 5 holes (count holes between the stitches). Using needle and a piece of black yarn, make smile (this can be done before blood drop is finished, or after). Stuff with polyester filling. TIP stuff the drop as you would normally do, until round 16 is reached. After that point, use small tweezers and keep adding the polyester filling often, in small amounts. This is the best way to shape the drop. R 15 (sc 3, dec)* (24) R 16 sc 24 (24) R 17 (sc 2, dec)* (18) R 18 sc 18 (18) R 19 (sc 4, dec)* (15) R 20 (sc 3, dec)* (12) R 21 (sc 2, dec)* (9) R 22 sc 9 (9) R 23 (sc 1, dec)* (6) R 24 dec to the end © My Amigurumi Farm. All rights reserved. Feel free to sell finished product made from my patterns - please credit My Amigurumi Farm as a pattern designer. Do not reproduce, sell, distribute, alter or claim content of this website as your own.
- FREE CROCHET DAIKON (MOOLI) PATTERN
Easy to make free crochet Daikon (Mooli) pattern. Enjoy! Size 10.5cm / 4.13 inch in length (excluding leaves) Tools & Materials Crochet hook size 2.5 mm Black safety eyes x 2 – size 6 mm Polyester Craft Filling for toys Tapestry needle and craft pins Scissors Stitch marker or a piece of yarn to mark the end of a round Yarn Light Green (Rico Essentials Cotton DK, Pistachio (86), 100% Cotton, 50g) White (Rico Essentials Cotton DK, White (80), 100% Cotton, 50g) Green (Rico Essentials Cotton DK, Grass Green (66), 100% Cotton, 50g) Black (Rico Essentials Cotton DK, Black (90), 100% Cotton, 50g) Skills required / abbreviations / info MG – magic ring (make specified number of single crochet stitches into the loop) Sc – single crochet Inc – 2sc increase (crochet 2 single crochet stitches into the same stitch) Dec – 2tog decrease (crochet 2 stitches together) CH – chain stitch F/O – finish off R – spiral round Row – row ( )* – repeat the sequence in brackets to the end of the round (12) – number of stitches expected at the end of the round Work in spiral rounds, do not turn/join unless stated otherwise Watch FREE video tutorials on my Facebook page here DAIKON (colours light green and white) Start with colour LIGHT GREEN R 1 mg, 6sc (6) R 2 (inc)* (12) R 3 (inc)* (24) R 4 (sc 3, inc)* (30) R 5 - 9 sc 30 (5 rnds) (30) Change colour to WHITE R 10 - 21 sc 30 (12 rnds) (30) R 22 (sc 3, dec)* (24) R 23 sc 24 (24) R 24 (sc 6, dec)* (21) R 25 sc 21 (21) Insert safety eyes between rounds 17 – 18, within a distance of 4 holes (count holes between the stitches). Using needle and a piece of black yarn, make smile (this can be done before daikon is finished, or after). Stuff with polyester filling. R 26 (sc 5, dec)* (18) R 27 (sc 4, dec)* (15) R 28 (sc 3, dec)* (12) R 29 (sc 1, dec)* (8) R 30 (sc 2, dec)* (6) R 31 dec to the end, then CH 5; next, starting from the 2nd chain from the hook, make sc 1 in next 4 chain stitches (to the back of the chain – now you’re crocheting towards the root) – when done, cut off yarn leaving longer tail and using needle weave in remaining thread. LEAVES x 4 (colour green) When starting/finishing each leaf, leave longer tails for sewing. When done, F/O and using needle attach each leaf to the top of the daikon. Use both tails, then weave in remaining threads. CH 7 Row 1 starting from the 2nd chain from the hook, make sc 1 in next 6 stitches (6) Row 2 CH 1, sc 6, turn (6) Row 3 CH 1, sc 6 (6) © My Amigurumi Farm. All rights reserved. Feel free to sell finished product made from my patterns - please credit My Amigurumi Farm as a pattern designer. Do not reproduce, sell, distribute, alter or claim content of this website as your own.
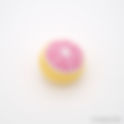
- FREE CROCHET GRAPEFRUIT HALF PATTERN
Easy to make free crochet Grapefruit Half pattern. Enjoy! Size 5 cm/ 1.96 inch inch in height Tools & Materials Crochet hook size 2.5 mm Polyester Craft Filling for toys Tapestry needle Scissors Stitch marker or a piece of yarn to mark the end of a round Yarn Yellow (Stylecraft Natural DK Bamboo + Cotton, Daffodil (7251), 60% Bamboo 40% Cotton, 100g) White (Stylecraft Natural DK Bamboo + Cotton, Chalk (7127), 60% Bamboo 40% Cotton, 100g) Pink (Stylecraft Natural DK Bamboo + Cotton, Blush (7133), 60% Bamboo 40% Cotton, 100g) Skills required / abbreviations / info MG – magic ring (make specified number of single crochet stitches into the loop) Sc – single crochet Inc – 2sc increase (crochet 2 single crochet stitches into the same stitch) F/O – finish off R – spiral round ( )* – repeat the sequence in brackets to the end of the round (12) – number of stitches expected at the end of the round Work in spiral rounds, do not turn/join unless stated otherwise Watch FREE video tutorials on my Facebook page here PEEL (colour yellow) R 1 mg, 6sc (6) R 2 (inc)* (12) R 3 (sc 1, inc)* (18) R 4 (sc 2, inc)* (24) R 5 (sc 3, inc)* (30) R 6 (sc 4, inc)* (36) R 7 (sc 5, inc)* (42) R 8 (sc 6, inc)* (48) R 9 - 14 sc 48 (6 rnds) (48) F/O and weave in remaining thread. Don’t stuff with polyester filling yet. FRONT OF THE GRAPEFRUIT (colours white, pink and yellow) Start with colour WHITE R 1 mg, 8sc (8) Change colour to PINK R 2 (inc)* (16) R 3 (sc 1, inc)* (24) R 4 (sc 2, inc)* (32) R 5 (sc 3, inc)* (40) R 6 (sc 4, inc)* (48) Change colour to WHITE R 7 sc 48 (48) Change colour to YELLOW R 8 sc 48 (48) F/O and leave longer tail for sewing Using needle, start attaching ‘Front of the Grapefruit’ to its ‘Peel’ (peel’ full stitch to front of the grapefruit’ BLO – check picture to see how completed fruit should look like) – before sewing is finished, leave small hole and stuff the grapefruit with polyester filling, then close the hole Once grapefruit is completed, using needle and a longer piece of white yarn, apply 6 dividing lines © My Amigurumi Farm. All rights reserved. Feel free to sell finished product made from my patterns - please credit My Amigurumi Farm as a pattern designer. Do not reproduce, sell, distribute, alter or claim content of this website as your own.
- FREE CROCHET ST. PATRICK'S DAY CAKE PATTERN
Easy to make free crochet St. Patrick's Day Cake pattern. Enjoy! Size 4.5cm / 1.77 inch in height Tools & Materials Crochet hook size 2.5mm Polyester Craft Filling for toys Tapestry needle and craft pins Scissors Stitch marker or a piece of yarn to mark the end of a round Small piece of cardboard (to keep cake's top flat) Fabric glue (optional) Yarn Bottle Green (Schachenmayr Catania, Moos (00412), 100% Cotton, 50g) White (Schachenmayr Catania, Natur (00105), 100% Cotton, 50g) Grass Green (Schachenmayr Catania, Apfel (00205), 100% Cotton, 50g) Skills required / abbreviations / info MG – magic ring (make specified number of single crochet stitches into the loop) Sc – single crochet Inc – 2sc increase (crochet 2 single crochet stitches into the same stitch) Dec – 2tog decrease (crochet 2 stitches together) BLO – back loops only DC – double crochet CH – chain stitch F/O – finish off R – spiral round ( )* – repeat the sequence in brackets to the end of the round (12) – number of stitches expected at the end of the round Work in spiral rounds, do not turn/join unless stated otherwise Watch FREE video tutorials on my Facebook page here CAKE (colours grass green and white) Start with colour WHITE R 1 mg, 6sc (6) R 2 (inc)* (12) R 3 (inc)* (24) R 4 (sc 3, inc)* (30) R 5 sc 30 (30) R 6 BLO 30 (30) R 7 sc 30 (30) Change colour to GRASS GREEN R 8 - 9 sc 30 (2 rnds) (30) Change colour to WHITE R 10 - 11 sc 30 (2 rnds) (30) Change colour to GRASS GREEN R 12 - 13 sc 30 (2 rnds) (30) Take small piece of cardboard (any thick piece of paper will work) and cut out a circle of a size of the cake's top. Next, place this circle inside the cake - this will keep the top flat; now stuff the cake with polyester filling. When completed, F/O and weave in remaining thread. R 14 (in BLO: sc 3, dec)* (24) R 15 (sc 2, dec)* (18) R 16 (sc 1, dec)* (12) R 17 dec to the end SHAMROCK (colour bottle green) Magic ring, 9sc into the ring. Join with sl st into the next stitch and CH 2, then 4 DC into the next stitch, then join with sl st into the next stitch. First leaf is now completed. Repeat the process 2 more times; once you have total of 3 leaves, join to the last stitch with sl st and CH 5, then cut off yarn leaving longer tail – using needle, pull this yarn tail throughout the length of the whole chain towards the centre of the shamrock and F/O. When completed, using fingers, pull the ‘corners’ of each leaf to shape them. Using fabric glue, attach to the top of the cake (centre of the shamrock only). © My Amigurumi Farm. All rights reserved. Feel free to sell finished product made from my patterns - please credit My Amigurumi Farm as a pattern designer. Do not reproduce, sell, distribute, alter or claim content of this website as your own.
- FREE CROCHET MOTHER'S DAY CAKE PATTERN
Easy to make free crochet Mother's Day Cake pattern. Enjoy! Size 4.5cm / 1.77 inch in height (including heart on the top) Tools & Materials Crochet hook size 2.5mm Polyester Craft Filling for toys Tapestry needle and craft pins Scissors Stitch marker or a piece of yarn to mark the end of a round Small piece of cardboard (to keep cake's top flat) Yarn Red (Schachenmayr Catania, Signalrot (00115), 100% Cotton, 50g) White (Schachenmayr Catania, Natur (00105), 100% Cotton, 50g) Pink (Schachenmayr Catania, Altrosa (00408), 100% Cotton, 50g) Skills required / abbreviations / info MG – magic ring (make specified number of single crochet stitches into the loop) Sc – single crochet Inc – 2sc increase (crochet 2 single crochet stitches into the same stitch) Dec – 2tog decrease (crochet 2 stitches together) BLO – back loops only F/O – finish off R – spiral round ( )* – repeat the sequence in brackets to the end of the round (12) – number of stitches expected at the end of the round Work in spiral rounds, do not turn/join unless stated otherwise Watch FREE video tutorials on my Facebook page here CAKE (colours pink and white) Start with colour WHITE R 1 mg, 6sc (6) R 2 (inc)* (12) R 3 (inc)* (24) R 4 (sc 3, inc)* (30) R 5 sc 30 (30) R 6 BLO 30 (30) R 7 sc 30 (30) Change colour to PINK R 8 - 9 sc 30 (2 rnds) (30) Change colour to WHITE R 10 - 11 sc 30 (2 rnds) (30) Change colour to PINK R 12 - 13 sc 30 (2 rnds) (30) Take small piece of cardboard (any thick piece of paper will work) and cut out a circle of a size of the cake's top. Next, place this circle inside the cake - this will keep the top flat; now stuff the cake with polyester filling. When completed, F/O and weave in remaining thread. R 14 (in BLO: sc 3, dec)* (24) R 15 (sc 2, dec)* (18) R 16 (sc 1, dec)* (12) R 17 dec to the end MINI HEART (colour red) Start by making 1st round part of the heart (R 1 - 3). R 1 mg, 6sc (6) R 2 (sc 2, inc)* (8) R 3 sc 8 (8) When completed, F/O, cut off yarn and put aside. Next, make 2nd, exactly the same part by repeating R 1 – 3. Once 2nd part is finished, don’t cut off yarn – instead join both parts with sl st. When both parts are made and joined, continue making heart. Stuff with polyester filling as you go. When done, cut off yarn and weave in remaining thread. Ready heart attach to the top of the cake. R 4 sc 8 (around 1st part), sc 8 (around 2nd part) (16) Don’t count sl st as a stitch (ignore it) R 5 (sc 6, dec)* (14) R 6 sc 14 (14) R 7 (sc 5, dec)* (12) R 8 (sc 1, dec)* (8) R 9 sc 8 (8) R 10 (sc 2, dec)* (6) R 11 dec to the end © My Amigurumi Farm. All rights reserved. Feel free to sell finished product made from my patterns - please credit My Amigurumi Farm as a pattern designer. Do not reproduce, sell, distribute, alter or claim content of this website as your own.